Pancakes!


Tuesday, July 2, 2013


Pancakes are simple and quick to make, but gluten-free pancake mix can cost a fortune! Guess what? You don’t need a mix! You can make gluten-free pancakes from everyday ingredients.
Our basic recipe is not very healthy, so use it in moderation. The “flour” is made up of one part asian rice flour, one part “sweet” or “glutinous” rice flour, and one part tapioca starch. We get all these ingredients cheap (about $1 per pound) at the asian grocery store.
Last week, however, my mom ordered a 50 lb bag of certified gluten-free buckwheat flour and shared some with me. So today we substituted the regular rice flour with buckwheat and the pancakes turned out great! The sweet rice flour and tapioca starch still make up 2/3 of the carbs in this recipe, though, so this is not a diabetic- or carb-friendly recipe. But it’s a nice treat once in a while, and the buckwheat does add some nice nutritional value to the meal.
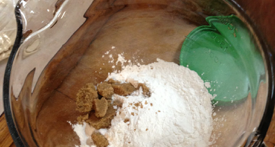
Ingredients:
1/3 c. Glutinous Rice Flour
1/3 c. Dark Buckwheat Flour
OR Superfine/Asian Rice Flour
1/3 c. Tapioca Flour
2 Tbsp Brown Sugar
1 heaping Tbsp Baking Powder
1/8 tsp Salt
1 Large Egg
Approximately 1/2 to 1 cup milk


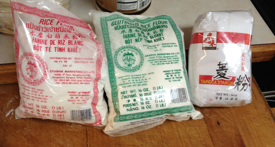
We buy our rice flours and tapioca flours at the Asian grocery store. They come in 1-lb packages and they cost about $1 each. These are staples of a lot of Celiacs and I’ve never heard of anybody having an issue with them, however they don’t carry any gluten-free certifications so you need to decide what you’re comfortable with.
If you would feel better with gluten-free certified ingredients, or if you simply don’t have an asian grocery store in your area, or if you want to try this with brown rice flour, I have linked several options below in addition to the Thai-sourced flours. Superfine rice flour is the same as Asian rice flour, but NOT the same as “regular” rice flour like what you might find at Bob’s Red Mill. Regular rice flour will work, but a more discerning palate will be able to tell the difference in texture. Glutinous rice flour and sweet rice flour are two names for the same thing. It’s also known as Mochi flour. Tapioca starch and tapioca flour are the same thing. You should be able to use just about any starch, such as corn or potato, and get similar or the same results; just be aware that, unlike tapioca, corn flour and potato flour are NOT the same as corn starch or potato starch. Feel free to experiment with other starches.
I have found that Amazon prices fluctuate wildly. As of the time I am writing this blog post, their prices on the Asian rice flours are astronomical. I included the links anyway, figuring at least it would contain handy product photos you might find useful as you shop. And maybe the price will come down. It helps if you sign up for Amazon Prime, which gives you free shipping on most items with no minimum order. The prices on other flours are often competitive, but not always. It never hurts to check around, but if you do end up buying from Amazon we’d love it if you’d use our links to help support the blog!!
Instructions: Combine dry ingredients and mix thoroughly with a spoon. Add the egg and mix. Slowly add milk until you get the consistency you want. A thicker batter will yield a fluffier pancake and a thinner batter will yield a flatter one, so you’re just going to have to experiment with this part until you get it the way you like it best. Roughly, the batter should be like a thin milkshake. Do NOT use an electric mixer and do not mix any more than you need to in order to combine the ingredients.
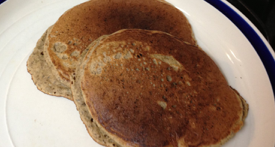
Oil your pan (we use an iron skillet or grill). Heat the pan over medium/low. It should be hot enough that if you flick a drop of water on it, it should sizzle; but try not to get it too hot. Using a large spoon or ladle, spoon the batter into the pan. Watch for bubbles beginning to rise and break in the center of your pancake. When you see that, it’s time to flip your pancake with your spatula. Cook about the same amount of time on the other side.